Autosleeper swing out sink/shower door fitting.

TrevandJenny

Full Member

Messages
193
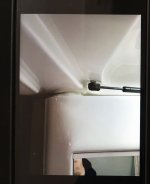
The sink shower swing door on our Autosleeper Broadway has dropped significantly, A quick call to Autosleepers for possible modification part as per Autosleeper owners forum,the recorded message states if your vehicle if earlier than 2019 they can offer no advice. The spares dept now closed again.
.
How much do buyers pay, huge amounts of income splashed out on them. Question is has any member on here had same problem with this door, if so what did they do to rectify the issue.
.
I understand at the factory they would dismantle the bathroom roof vent to be able to feed through the roof linings a modified top hat fitting and lower it onto the top of the spigot and bond it in place.
.
I cannot do this as I scrapped the original roof vent for a Fiama roof vent with extractor fan, this is bonded onto the roof, I’m not removing it.
.
Suggestions please
IMG_1076.jpeg
 
Has this dropped ? If it has I would be making a plastic sleeve for the top to take up the slop! Made from hard plastic pipe or similar with a spiral slit to thread it on ,
Then find a way of packing the floor to little it into original position
 
Has this dropped ? If it has I would be making a plastic sleeve for the top to take up the slop! Made from hard plastic pipe or similar with a spiral slit to thread it on ,
Then find a way of packing the floor to little it into original position
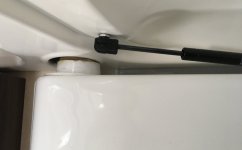
Above the spigot in the picture is a void much the same size depth as an old white plastic type coffee cup. It seems the top fitting has moved, hence only way is to lift panel up to fill void.
.
I can lift the entire panel up to take up the slack so to speak around 15mm+, I measured the bottom spigot and have made a spacer to fit around it raising the panel into position,
.
Will test fit these in the morning, Thank you for your spiral suggestion, my wife suggested a similar idea.
 
The following measurements may be of use to anyone who has an Autosleeper with the swinging door shower door system.

I must point out I did not remove the door to rectify the problem, it was a pain getting the measurements from the bottom of the swing panel so these may help others.
.
I lifted the door as far as it would go and blocked it up. I measured the O/D of the moulded door spigot with a caliper ,then the available diameter to fit a spacer.
.
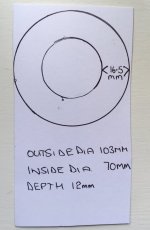
I made a spacer from hard foam 12mm x 103mm O/D, then cut a centred hole of 70mm I/D giving a round holed disc with a surface face of 16.5mm. I then split the spacer so as to fit around the spigot rejoining with a dowel.
.
It held up perfectly, with very little drop, so will leave it in at present.
.
As the material used was for a let’s try it and see project, if it fails I will reproduce one it polished acrylic.

IMG_1079.jpeg
.
 
That is excellent Trevjenny. I am curious as to why it dropped in the first place, did something break? I'll have to look at mine and see what it is pivoting on.
 
Great solution, nicely worked out. If you can get your hands on some UHMWPE (Ultra-High Molecular Weight Polyethylene) for the final version I’d go with that as an alternative to polished acrylic.
 
That is excellent Trevjenny. I am curious as to why it dropped in the first place, did something break? I'll have to look at mine and see what it is pivoting on.
It seems a design fault, on the A/S owners forum it is claimed that in production the top of the door spigot top hat is wedged in position, when movement happenens IE driving along for a while the door drops.
.
It seems a repair can be done at the top however the favoured way is as I have done at the bottom.
 
Great solution, nicely worked out. If you can get your hands on some UHMWPE (Ultra-High Molecular Weight Polyethylene) for the final version I’d go with that as an alternative to polished acrylic.
I have never used this material but will now research it, Thanks for advice. Found it now tech name PE1000, not cheap though.
 
Last edited:
Great solution, nicely worked out. If you can get your hands on some UHMWPE (Ultra-High Molecular Weight Polyethylene) for the final version I’d go with that as an alternative to polished acrylic.
I would need 12mm thick, is it available??
 
. . . .or a 12mm thick stainless steel ball bearing?
 
I would need 12mm thick, is it available??
Probably, it is expensive but for the amount you need I would see if a plastic specialist would be happy to provide you with an off-cut (or “sample”) at a more reasonable price (if you can find one nearby that is).
 
Probably, it is expensive but for the amount you need I would see if a plastic specialist would be happy to provide you with an off-cut (or “sample”) at a more reasonable price (if you can find one nearby that is).
Thanks for the offer, as per my listing above I will leave temp packing piece in place, if it stays in situ, it will stay, if not I will consider options as yours above, thanks.
 
Removing and replacing with new all the water pipes is simple. It is part of the first hab check when you find that they could never possibly have run without leaking, the quality of the pipes is diabolical, the worst I have ever seen in my professional career. Where they get them from is a mystery.
 

Users who viewed this discussion (Total:0)

Back
Top