080 loo n tray in place to see if the heater hoses would fit, but ended up moving to the other side of tray to accommodate the electrics behind loo wall, I should have left them there 0130512_113433

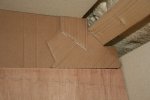
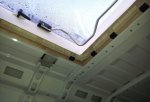
081 54a First ever wallboard template cut done, scary at the price of them, so I scribed direct to a 3mm ply template, it fitted
like a glove

082 54b Top of ply template, I used cardboard as it easier to mess with and
I found there were differences in the vans metal roof height

083 54c Just add bits using double sided tape til its a snug fit, then transfer it to the lightweight ply

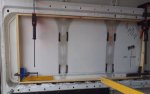
084 55a then take a very large breath and cut your first expensive sheet, PHEW, outer front loo wall in position

085 55b nice snug fit, you can see the u shaped plastic track which holds the wall in place,
I found some matching beige silicone to seal the track to the board,
this board was a cheapo paper faced ply, So I got some aerosol cans of stain lacquer
made up and I sprayed each board to waterproof it, never saw any marks on them

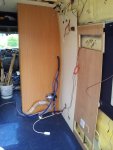
086 55c other side of wall in 085 shows control panel,
solar reg and volt meter for VB looks weird but it is straight.
You can see to the left the blue carpet covered overcab locker, I never did put a door on it, but nothing ever fell out

087 57a shower tray side supports, I have read of so many problems with
shower trays cracking I did my best to make sure this £27 one didn't, it is still
100% watertight

088 57b shower tray bottom support fully bonded to base with Stixall no way this is going to flex and crack,
I offered it up to the floor in position, and drilled through with a 300mm long drill both waste positions,
as it turned out one was directly over the chassis so couldn't be used, so one got welded and just to be sure
stixalled it too never leaked to my knowledge

089 58a back side of shower and left side of wardrobe decorative ply in situ, holes are there as this is where the
main
fuse board will be located later and the back ply is the back of the fridge housing, a lot of work there,
and more to do yet, top fridge vent to figure out and cut, bottom one already done,
this was to fit a full height fridge freezer, pump was later moved, wish I left the heater piping where it was
in the earlier picture, see the kinking, I'd not accounted for the width of the corner profile, fortunately this part of
the pipe only went to a vent facing the back of the driver seat, as I sit up there a lot reading and watching the
world go by so wanted heat when parked 2013-06-14 11.44.43

091 62a Truma E4000 in place on it's original plinth, now moved to outside wall on right,
as it was a better use of space 2013-06-15 17.39.45


 2013-04-1...jpg")