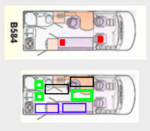
Here's the layout I have now with the second system added. The red boxes are the leisure batteries. The front, existing one (A) under the passenger seat (it's LHD). The existing
solar panels are in black. The skylights/vents in green. The new
solar panels in blue.
I had thought to mount them on the front sloped section above the cab, so you could park straight into the sun for slightly better
solar yield. The panels I use are about 1200x550mm (100 watt). There are some others about 1000mm square (150 watt) and 2 of them might go in that space on the front. Decided against it as it would look a bit ugly and I wasn't sure of the fit.
The Electroblock (EBL) is in the front right corner.
The existing
solar controller is mounted on the side of the drivers seat base (between the seats). The display is next to the Truma control on the front wall of the wardrobe which is on the left of the vehicle between bathroom and desk.
The fridge is in the rear, right corner. I thought best place for the second leisure
battery (B) is under the couch (sofa) seat. Run the
solar cable down the wall behind the curtain and the
solar controller and display up on the cupboards above or next to the original Hymer control panel above the rear door. Or I could put the
solar controller down on the kick panel under the couch.
Main thing is the routing of cables.
Solar -
1. 10AWG
Solar panel cable from 2 panels on the roof to the controller. A double adaptor on the roof to join the 2 panels. I was thinking of putting another double adaptor under the couch, so I could have a lead to run outside through the locker door under the couch to the portable
solar panel outside (if I need it). It might run through the gap when the locker door is closed or maybe it would need to be left open, or possibly some kind of socket under a flap on the outside wall?
2. Controller to leisure
battery (B) cable.
3. Leisure
battery (B) to
inverter (also mounted under the couch).
4. 240 volt cable to fridge - can run through the cupboard, along the floor next to the rear door.
5.
Solar controller to its LCD display - back along the
solar cable route to wherever I choose to mount the display.
6. Leisure
battery (B) - to chassis/body.
B2B charger -
This can be wired in various ways, one of which is to the EBL, but I'm not doing that as it's purpose is to charge the fridge leisure
battery (B). I did toy with the idea of putting in a dual circuit with a switch so I could choose either leisure
battery system to charge, but that's too complicated.
As this will be carrying 20-30A over about 3 metres it's going to need a hefty cables. I know I can get through to the starter
battery (which is in the extreme front, right corner) under the dash in front of the passenger seat. The B2B has a display which I thought I might put near the drivers seat as it'll be on while driving. There's room to the left of the driver.
I think I'll mount the B2B on the face of the cabinet the Electroblock is in (to the right of the passenger seat). Nope, needs to be closer to the leisure
battery (B), so back under the couch.
1. 6mm (maybe 10mm) + cable from B2B through the firewall to starter
battery + terminal.
2. 6mm cables (+&-) from B2B back to leisure
battery (B).
3. LCD display cable from B2B to the display near the drivers seat (if it reaches).
Fuses (placed nearest the second item) -
1. 40A
fuse between
solar panels and controller. I use a circuit breaker which makes it easy to turn off the
solar panels if required for work.
2. 40A
fuse between controller & leisure
battery +
3. 50A
fuse between B2B and starter
battery +
4. 40A
fuse between B2B and leisure
battery (B) +
") I was thinking of the big 240 volt startup surge of the fridge, but the
I was thinking of the big 240 volt startup surge of the fridge, but the