Protecting your Starter Battery

I have a different version of Electronic, but I suspect the charging is the same
worth pointing out that it's 21 years old now, so possibly not quite as well calibrated as it was in its youth. So don't assume that they all do the same.
 
I have a different version of Electronic, but I suspect the charging is the same.
A month or so ago we were staying somewhere with hookup and I was checking the operation of a new battery monitor. So I took notice of what the charger did.
Turns out that the EBL is smarter than I thought. It goes through the bulk stage as you'd expect, then sits at 14.4 or so for a while before dropping back to a commendably low 13.62v float.
If it restarts the cycle, it shortens the absorption stage significantly. I'm not sure about exact timings, but it seemed about right
I hadn't realised that it was as good as it is.
The starter battery feed is a very simple one. Just a slow trickle, slow enough that it won't do any harm.
Sounds like it is a fairly decent charger.
The reason why the absorption stage could be shorter on a restart of the cycle is that it either keeps a timer on how long it has been in Absorption for, or it makes an assumption on how long.
Batteries should not be subject to the high voltage that the Absorption stage puts out for more than a certain amount of time (which is why a significantly underpowered charger (relative to the battery bank size) can be an issue).
How long a battery should be allowed to sit at the absorption voltage varies from Battery to Battery. A rule of thumb is 6 hours if no other is available. FWIW, my own batteries have a recommended maximum absorption charge time of just 5 hours.
 
Yes, from what I recall, the starter battery charge voltage from the EBL starts at around 13.5V on the on-board meter (which is not particularly accurate - it could be 13.8V because the meter stops at 13.5V!) and drops quite quickly (a few hours?) to around 12.5V. The leisure battery also starts at around 13.5V but I can't remember what it settles at. Might stay at the 13.5V, not sure - which is consistent with others' posts.

At the moment, I'm just keeping an eye on the LB. It's showing 12.6V so I'm happy with that, and I've a solar trickle charge on the VB. The VB was showing signs of not holding its charge, but I'm thinking actually it probably wasn't charged properly: after 10 days on EHU and another 10 days on solar trickle it's now maintaining around 12.5V when off the trickle and is floating at about 13.2V when on the trickle. A check once a week is what's needed, I reckon and use either the EHU or the trickle charge as required.

My trickle charger is a cheapo 13W briefcase jobbie from Maplins. The spec doesn't say what voltage its controller regulates to but I've never seen more than 13.2V on the battery output so perhaps that's its max. It sounds like that would be fine if I just left it on all the time?
 
After four weeks not driven my Berlingo battery was flat. I tried unsuccessfully to boost the starter battery with the leisure battery. When I searched a bit it seemed to be saying not possible as they batteries are made differently to give power at different speeds. Was that worthless exercise. I got mine started by fixing the jump leads to my wife's car and running that one for a while.
I have since bought a lithium battery charger if something like this happens again.
We had to tow the Berlingo out of the drive to get them together for the jump leads.The towing escapade would have kept the neighbours amused.
those little lithium jump packs (if that is what you bought?) are brilliant, aren't they!
The starter battery on my van was pretty knackered and beyond redemption when I bought the van, but I wanted to wait until the next spring to replace as only started the engine every few weeks while converting. The Jump Pack came in very handy :D (also used it later on at a couple of Wildcamping meets to help out other vans that had dead batteries).
 
After four weeks not driven my Berlingo battery was flat. I tried unsuccessfully to boost the starter battery with the leisure battery. When I searched a bit it seemed to be saying not possible as they batteries are made differently to give power at different speeds. Was that worthless exercise.
You certainly should be able to boost a starter battery with a leisure battery. Give it ten or fifteen minutes to put enough power in, then try starting.
You may not be able to start an engine directly with a small leisure battery (after disconnecting the flat battery first), but in warm weather, I would expect it to manage a small engine like a Berlingo's. Of course it does depend on how good your jump leads are. The cheap ones with thin aluminium wire are useless.
Good fat copper jump leads are not cheap, but they work well and last decades.
 
Mmm I didn't wait to put enough power in from the leisure battery, and I tried to link the two batteries to start. Pretty wrong all round.
I did wonder if the leisure battery was flat as well. Am I right in thinking that the leisure battery will no be parasitised by other sources like the a starter battery. My jump leads are copper.
 
Imagine that your batteries are buckets of water. One is empty, the other is half full.
Join them together with a thin pipe and after a while you might have two quarter-fukl batteries.
Then the thick pipe from the starter battery to the starter might be enough.
On the other hand, if one is an empty bucket and the other is just a large coffee mug, join them together and you'll get not much.
But disconnect the starter battery bucket and connect the coffee mug to the starter with a thick pipe - it might get the engine going.
Hmm. Not sure that analogy works too well...
 
Last edited:
Just about everyone have their Campers and Motorhomes parked up for likely the next 2 months and quite possibly longer. But just like a parked-up car, the Starter Battery will start to flatten when not used.
Various ways to deal with this ...
If you have a VSR split-charge system, this will engage when the Leisure Battery is under a charge, so that will help take care of the starter.
Some Solar Controllers can do a trickle-charge to the Starter when there is PV Harvesting
Some Factory Motorhome Electrical Systems will do a Starter Trickle Charge.
But the majority of campers do not have any of the above, so need an alternative way.
One option - and could be a worthwhile option - is simply to disconnect the Starter Battery. This will prevent it draining as fast (but bear in mind stuff like Central Locking, Vehicle Alarm and those kind of things will no longer operate.
Another option - and one for the longer term - is to fit a Battery Maintainer, and I thought I would do a post to show how simple it can be to fit a Battery Maintainer and it is definately a DIY job you can do while your van is stranded on the driveway.

There are a number of standard Battery Maintainers around, for example Nick of vanbitz on the forum have the Battery Master unit. This following how-to will be done using the Ablemail AMT Battery Maintainer, but the principle of installing one will be pretty much the same no matter which one you get so you can look at this example and apply the steps to whatever you get if you decide to get one.

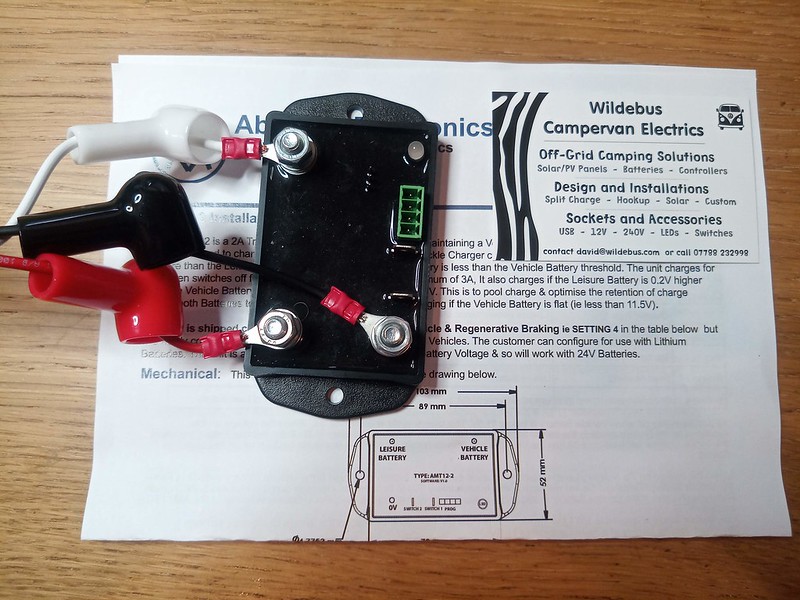
So for the AMT 12-12 Battery Maintainer, this is what you get
Battery Maintainer
by David, on Flickr
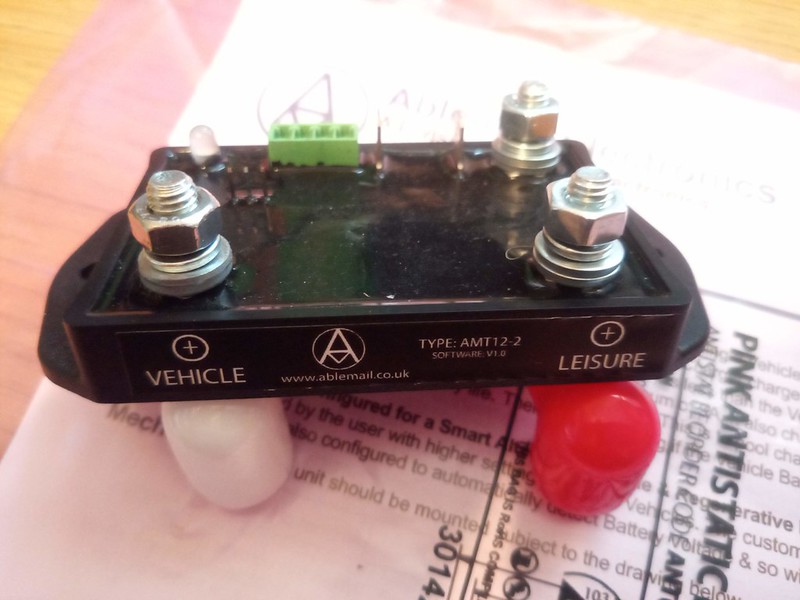
There are three connections (and this will be also true of any maintainer) - 0V (Ground) at the back, +V Leisure (so the +ve of the Leisure/Habitation Battery) and + Vehicle (so the +ve of the Starter/Vehicle Battery)

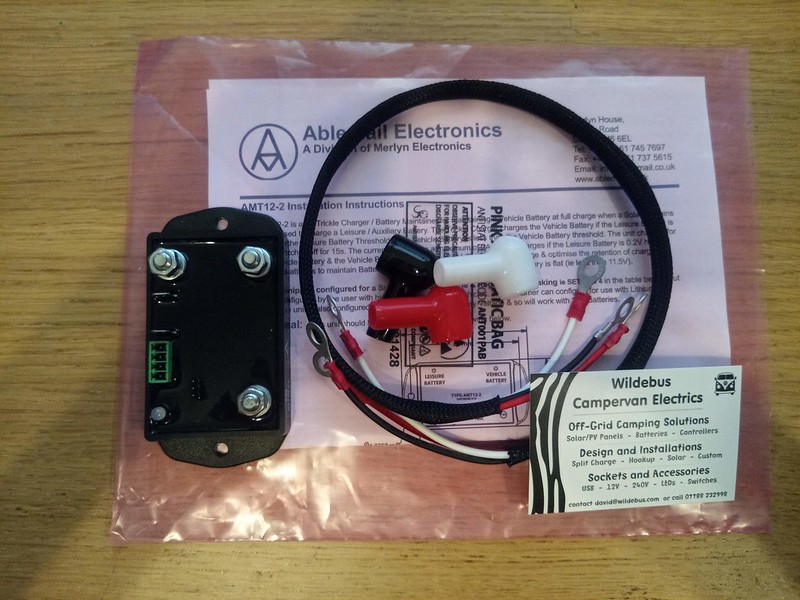
What I recommend you get to go with this Battery Maintainer are some cables and boots. Some Maintainers may have attached cabling pre-wired; others will need cables to be fitted.
Battery Maintainer
by David, on Flickr

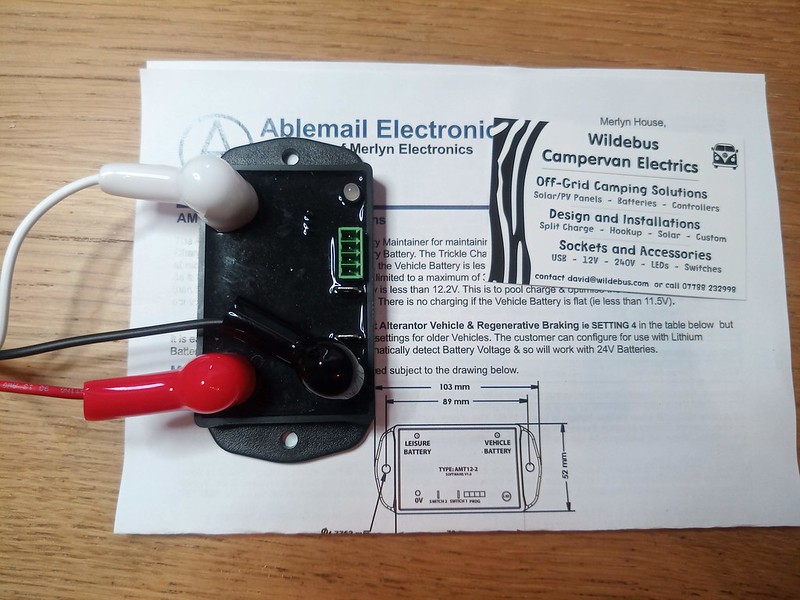
So installation is dead easy. You connect up the cables to each of the studs on the AMT. I am using Black from the 0V, Red for the +Leisure and White for the +Vehicle. Any colours can be used of course, but I am using those for a specific reason 😉

Battery Maintainer
by David, on Flickr

You then slide the cable boots over the studs and they are now nicely protected
Battery Maintainer
by David, on Flickr

Now the key thing now is to connect the 0V and the two +V cables to appropriate connections for the Starter and Leisure Battery. Exactly where is the best place in YOUR van will vary from vehicle to vehicle, but I find a good place to use is a B2B (Battery to Battery) Charger if there is one fitted, and this is what I have done here.

I am going to connect all three cables to the corresponding terminals on this Ablemail B2B
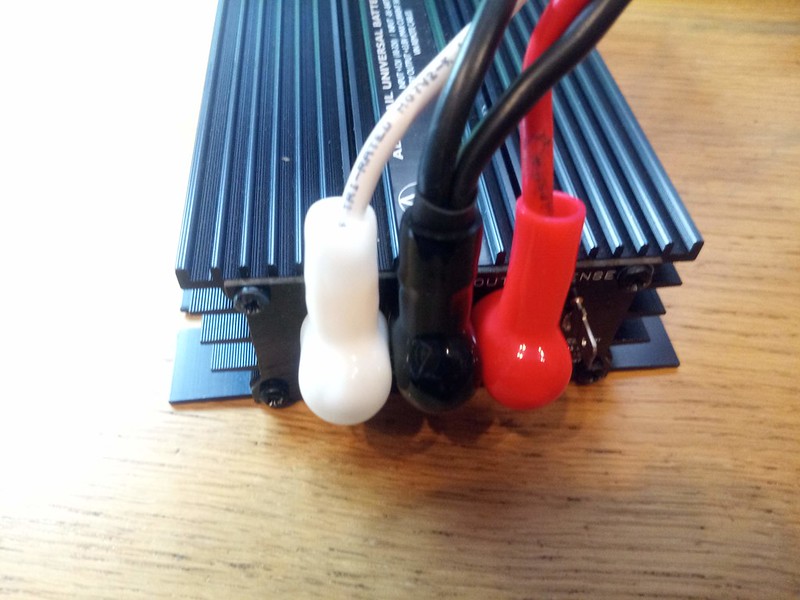
Battery Maintainer
by David, on Flickr
The fact both the Battery Maintainer and the B2B are both Ablemail products is irrelevant. Just like any Battery Maintainer will have those three terminals I mentioned, every B2B will also have the same +V for Starter and Leisure Batteries and a Ground/0V connection. There is no communication between the two devices, it is just a handy place to piggy-back the cables.

So now simply a case of connecting the cables up. With this B2B, I just undo the nuts and double up the ring terminals
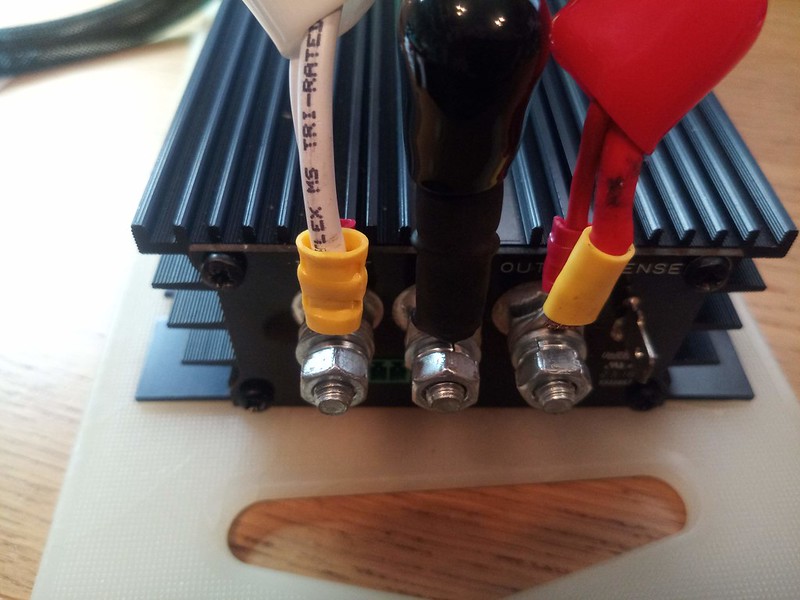
Battery Maintainer
by David, on Flickr
You see here why I chose to use Red, Black and White - it corresponds to the B2B wiring (and also the stud boots as well).

And that is all there is to it to have the Battery Maintainer working.
In this example, if you got the cables with the Battery Maintainer the only tool you needed to have for the entire installation was a 10mm socket


OK, so what does it look like working? This particular Battery Maintainer operates on a constant cycle of 3 seconds on, 9 seconds off, with a maximum current of 3A.
This is my own van, looking at the Starter Battery over the last 7 days
View attachment 53844
As you can see, the voltage has been decaying over the last 7 days and dropped down to 12.2V by around lunchtime today. Now my Starter Battery is pretty new (under a year old) so is holding up well. While I don't have an Alarm, I do have a tachograph that is always ticking away and using power, so keeping an eye on the Starter Battery is pretty important for me.

The sudden spike is when the Trickle Charger was connected. You see the immediate effect of the Solar now able to work on the Starter Battery as well as the Leisure Battery.
Drilling down into more detail, you can see how it is working
View attachment 53845
Connected just before Noon and the voltage went up and stayed at a fairly constant 12.4V. It is 12.4V as the unit came pre-configured for a vehicle with a SMART alternator, and with those vehicles you do not actually want to fully charge the starter battery due to the way the vehicle electrics work with stuff like regenerative braking.
I then changed the mode from the default "4" to Mode "1". This changes from a SMART Alternator to a basic one like on my 2003 VW. The effect of this on the AMT is to change the maintenance voltage from 12.4V to 12.8V (so keep the Starter Battery pretty well fully charged). Modes 2 and 3 are the same ref SMART/Dumb Alternators, but tuned to Lithium Leisure Batteries rather than Lead Acid technology.

I hope this may have been of some use or interest. At least it would have killed a bit of time for anyone reading it as well as for me typing it up 😁. (I thought I would do this write-up as I was connecting the Battery Maintainer up anyway to do a little pre-check before sending it off to Switzerland).

Cheers and Have Fun!
Thank you for the mid morning, interesting reading & helpful advice always appreciated
 
Given that lead acid and lithium batteries require different charger settings is there any issue linking a lead acid starter battery to a lithium leisure battery?
As one of my 12v power sockets connects to a permanent live connection on the starter battery I find it simpler just to plug in a dedicated solar panel to maintain the starter battery.
 
Hi, my set up is very basic and wonder what I can do to maintain my starter battery.
In essence I have the leisure battery connected to the starter battery via split charger but nothing else, no controllers that are mentioned etc.
so can I just simply install the fused bridge idea? Will this top up the starter battery?
Any advice appreciated, thanks.
Yes you can but I would not use it as a long term solution, I only mentioned it originally as a way for people like yourself with vans sitting idle at the moment to keep their vehicle battery charged. With Clive's idea he does say to carry spare fuses as you will forget to disconnect the lead and the fuse will blow. A longer term solution would be to fit something like a Battery Master which is what I did some years back. (even I could do it). I originally used the fused link because the starter battery was low and the van wouldn't start and after a while it had transferred enough electrickery to boost it enough to do its job.
 
My solar panel only charges the leisure battery. I have also fitted a smart charger for times when we are on hookup, but have never bothered to add anything to link the vehicle battery to the charging system because it's never been a problem as we use the vehicle frequently enough to keep it charged....until now!
I do carry one of these for emergency use, which can be run from a socket connected to the leisure batteries to the socket on the dashboard - which is live even when the ignition is off on my vehicle. I'm intending to simply connect that up every couple of weeks - I don't think I should leave it connected too long as I suspect it might not do the vehicle battery any good.
Those are a handy lead and will do the job of trickle charging. I think your approach to connecting it periodically is good :)
the one thing I don't like about how these leads are described are with the words "jump lead" in the description as it is certainly not! I know the sellers use that term so they feature in searches, but it is misleading.
 
Looks like a neat piece of kit with the facility to get a quick check of battery condition before you start.
A daylight connection every couple of weeks ought to do the trick - you should get 14v or so for a few hours if it needs it.
 
Another possibility is a cable from one cigarette lighter plug to another. Certainly on my van, there is a socket on the dash that runs from the engine battery, but all the others are powered by the hab battery. And that way, because both sockets are fuse-protected, there is a fuse at each end of the cable.
Clearly you don't want a huge voltage difference when you connect, so (assuming you have a split charge relay or VSR, not a B2B) you should start the engine and leave it running for a few minutes to equalise the voltages before plugging it in.
Post #7
".... A better option to that is a a 12V to 12V extension lead. One end to living area socket and the other to the cab 12V socket. ..."
 
I do carry one of these for emergency use, which can be run from a socket connected to the leisure batteries to the socket on the dashboard - which is live even when the ignition is off on my vehicle.
I have one of those, £8.99 from Amazon is a good price,
41WzIF60glL._AC_.jpg
before I fitted a solar controller that also charged the VB I used to just plug it in when the sun was out, I run the TV from the VB so keeping it topped up is necessary, a bonus is if you have a low battery (not dead obviously) on your car a donor car with the engine running for 15 minutes will put enough in to start it.
Good thread David (y)
 

Users who viewed this discussion (Total:0)

Back
Top