Installation of a Lithium battery in Hobby motorhome help

Tiggerific Tails

Full Member

Messages
8
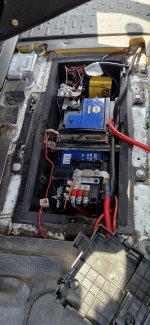
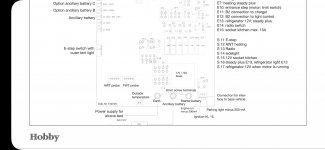
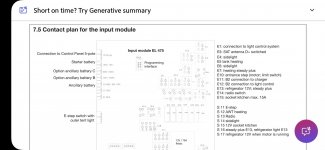
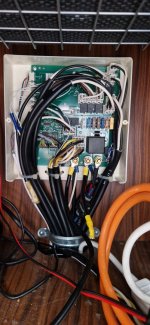
So I'm wanting to start to upgrade my batteries to lithium in our 70 HGE premium but have read that when you start your engine a really links the vehicle battery and Leasure battery in parrell so that alternator charges both but won't this cause an issue if I fit lithium Leasure battery is there a way to remove the relay link and just use a DC to DC to do the same
 
You’re correct—leaving the dual-charge relay operational will create a charging loop, allowing some of the charge from the DC-to-DC charger to feed back into the starter battery.

Could you let me know which control system is installed in your van? It would be helpful if you could take some photos and post them here, so I can advise further.


xs2.png
 
I know the company that made board are called toptron
 

Attachments

  • Screenshot_20250622_182440_Adobe Acrobat.jpg
    Screenshot_20250622_182440_Adobe Acrobat.jpg
    153.2 KB · Views: 3
  • Screenshot_20250622_182433_Adobe Acrobat.jpg
    Screenshot_20250622_182433_Adobe Acrobat.jpg
    172.4 KB · Views: 3
I remember your van!!!

Where are you based?

The simplest solution is usually to desolder the 70-amp relay from the PCB. Alternatively, if you’re comfortable working with electrics—which seems likely since you’ve provided circuit diagrams—you can disable the relay by cutting the PCB track controlling its coil. Typically, the relay coil terminals (the smaller terminals on the back) will have one side going to ground and the other to live; cutting this track will prevent the relay from energising.

However, disabling the relay in this manner can occasionally introduce a minor issue. For example, the heating system, which operates on the auxiliary side through the control panel, may experience a momentary voltage drop, causing the clock to reset. If this occurs, fitting a timer relay to ensure the relay closes and remains closed for a couple of seconds before full disconnection can be beneficial.

If the van were with me, my approach would be:
  1. Turn off all power and disconnect both batteries.
  2. Disable any solar controllers that might be supplying power.
  3. Unplug all connectors from the PCB, clearly marking their positions (take photos for reference). Generally, these plugs are unique and can’t easily be mixed up, but marking them is always recommended.
  4. Remove the three 6 mm screws at the bottom of the PCB to release it. Usually, you can fold the PCB forward carefully for easier access.
  5. Desolder the relay. The advantage of desoldering is that, if any issues arise, you can simply solder the relay back in.
Please let me know if you have any questions or need further guidance!
 
We are based in South Wales at the Top of the valleys

I'm ok at understanding electrics but I'm not a dab hand with circit boards and soldering. I can do most other bits like cables and set up batteries wire a plug ect lol

But if you know of someone who can l
Help without costing to much I'm willing to travel as can work remotely during the week
 
Back
Top