Portable/Auxilary Battery setup

wildebus

Full Member

Messages
6,217
There is a discussion on Jagmanxs thread about extra power options that touched on "battery in a box" type setups.

I thought I would post some comments and pictures of what I think is a good low-cost way to use a old spare battery (or a new one bought for the purpose for that matter) in an easy, reliable and, most importantly, safe way.

#1 - Get a Battery Box.
Different sizes are available to suit whatever battery you have or are looking to get. The boxes tend to be similar in height and depth and only really vary in length.

#2 - Fit External Sockets and Connectors.
The things I fit are as follows:
Voltmeter - to keep an eye on the Battery State
USB Sockets - Charging phones, etc. A handy space-saver can be to use a Combo Voltmeter + USB Socket
12V Socket - usual accessories and a way for lower (<10A typically) charging or supply
Anderson Plug - connection for higher current charging or supply - upto 50A

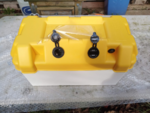
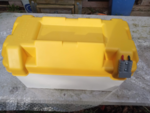
I fit these to the lid of the battery box - Anderson Plug one side and the others on the other. I also fit a Switch so I can turn off the Voltmeter and USB sockets to save power when not in use.
1579617081235.png
12V, USB, Voltmeter and Switch (covers taped up for photo)
1579617155589.png
Anderson Plug

#3 - Internal Cabling
Next Step is to wire up the Battery to the connectors

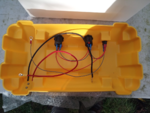
On the lid run Ground and +12V wires of suitable gauge.
1579617472091.png
The +12V wires will go to fuse holders and the Ground will go to the battery

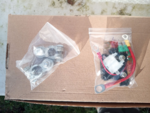
And on the box side, fuse Holders and the other side of the +12V cables, plus battery post terminals as appropriate
1579617540384.png
For the High Current Anderson Plugs, I use a midi-fuse Fuse Holder with mini-ANL fuse, and for the other circuits (USB, Volt and 12V Socket) I use a standard Spade Fuse holder.

This setup will give you a portable battery that can be used without having to mess around with croc clips and the like every time as it is all cabled up securely internally, no exposed terminals and the same connections as your regular ones fitted in the motorhome/campervan.

#4 - Charging
The 12V Socket and Anderson Plugs are by nature bi-directional so can be used for both Supply AND Charging.
The cables that can be used include the following:

12V - 12V Lead
1579618345209.png
One end goes in the 12V socket in the Battery Box; the other to a 12V socket in the van. If the Leisure Battery voltage is higher than the Portable Battery (if say the Split Charge is active), then the Portable Battery will get charged. If the Portable Battery voltage is higher than the Leisure Battery then power will transfer from the Portable Battery to the Leisure Battery and help supplement that supply via the 12V-12V cable.

12V Socket - Croc Clips
1579618661930.png
Another handy lead is the 12V Socket to Croc Clips. This can be used with the 12V-12V lead to connect direct to the battery and could be used for example to put some charge back into a low Starter Battery (not suitable for jump starting though!)

Anderson - 12V Plug
1579619127395.png
This is a handy lead as it allows the Portable Battery to be connected to the van for charging or to provide a boost, whilst keeping the 12V socket in the Battery Box free for use.

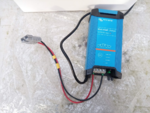
Having an Anderson Plug connection gives a lot of flexibility. You could have an Inverter with the DC inputs fitted with an Anderson Plug and connect to the battery. Or like in the example below, a Battery Charger with an Anderson Plug on the DC outputs to charge up the battery (maybe when left in the garage between trips?)
1579620916963.png

#5 - Example Setup
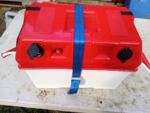
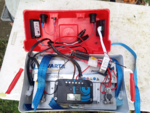
This is a photo of the Battery Box I use myself in a Gazebo at shows.
1579621348231.png

Same setup as the bigger box in the first photos, but fitted with a 75Ah battery that will fit in a medium-size box
1579621082648.png
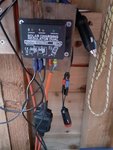
I also fitted a Solar Controller (in this case a spare 20A PWM unit I had), wired permanently to the battery and with the inputs via a pair of MC4 connectors (as used by the majority of Solar Panels), fed out the side of the lid so easily accessible.
(In the one above, I also fitted a couple of different battery monitors at each end to demonstrate. Just ignore those ;) )

Is it as smart as one of the "Battery Generators" or "Solar Generators"? Absolutely not, but I think this approach provides something just as capable but for a significant saving in cost :)
Is it worth doing this over just having a loose battery and a pair of jump leads? Absolutely yes, as you have a setup that is instantly usable in lots of different ways, with secure connections that won't drop off and no exposed terminal posts :)
Can you do this yourself? Again absolutely yes and with minimal tools and at low cost :D
 
There is a discussion on Jagmanxs thread about extra power options that touched on "battery in a box" type setups.

I thought I would post some comments and pictures of what I think is a good low-cost way to use a old spare battery (or a new one bought for the purpose for that matter) in an easy, reliable and, most importantly, safe way.

#1 - Get a Battery Box.
Different sizes are available to suit whatever battery you have or are looking to get. The boxes tend to be similar in height and depth and only really vary in length.

#2 - Fit External Sockets and Connectors.
The things I fit are as follows:
Voltmeter - to keep an eye on the Battery State
USB Sockets - Charging phones, etc. A handy space-saver can be to use a Combo Voltmeter + USB Socket
12V Socket - usual accessories and a way for lower (<10A typically) charging or supply
Anderson Plug - connection for higher current charging or supply - upto 50A

I fit these to the lid of the battery box - Anderson Plug one side and the others on the other. I also fit a Switch so I can turn off the Voltmeter and USB sockets to save power when not in use.

View attachment 52607
12V, USB, Voltmeter and Switch (covers taped up for photo)

View attachment 52608
Anderson Plug

#3 - Internal Cabling
Next Step is to wire up the Battery to the connectors

On the lid run Ground and +12V wires of suitable gauge.
View attachment 52609
The +12V wires will go to fuse holders and the Ground will go to the battery

And on the box side, fuse Holders and the other side of the +12V cables, plus battery post terminals as appropriate
View attachment 52610
For the High Current Anderson Plugs, I use a midi-fuse Fuse Holder with mini-ANL fuse, and for the other circuits (USB, Volt and 12V Socket) I use a standard Spade Fuse holder.

This setup will give you a portable battery that can be used without having to mess around with croc clips and the like every time as it is all cabled up securely internally, no exposed terminals and the same connections as your regular ones fitted in the motorhome/campervan.

#4 - Charging
The 12V Socket and Anderson Plugs are by nature bi-directional so can be used for both Supply AND Charging.
The cables that can be used include the following:

12V - 12V Lead
View attachment 52620
One end goes in the 12V socket in the Battery Box; the other to a 12V socket in the van. If the Leisure Battery voltage is higher than the Portable Battery (if say the Split Charge is active), then the Portable Battery will get charged. If the Portable Battery voltage is higher than the Leisure Battery then power will transfer from the Portable Battery to the Leisure Battery and help supplement that supply via the 12V-12V cable.

12V Socket - Croc Clips
View attachment 52621
Another handy lead is the 12V Socket to Croc Clips. This can be used with the 12V-12V lead to connect direct to the battery and could be used for example to put some charge back into a low Starter Battery (not suitable for jump starting though!)

Anderson - 12V Plug
View attachment 52622
This is a handy lead as it allows the Portable Battery to be connected to the van for charging or to provide a boost, whilst keeping the 12V socket in the Battery Box free for use.

Having an Anderson Plug connection gives a lot of flexibility. You could have an Inverter with the DC inputs fitted with an Anderson Plug and connect to the battery. Or like in the example below, a Battery Charger with an Anderson Plug on the DC outputs to charge up the battery (maybe when left in the garage between trips?)
View attachment 52623

#5 - Example Setup
This is a photo of the Battery Box I use myself in a Gazebo at shows.
View attachment 52625

Same setup as the bigger box in the first photos, but fitted with a 75Ah battery that will fit in a medium-size box
View attachment 52624
I also fitted a Solar Controller (in this case a spare 20A PWM unit I had), wired permanently to the battery and with the inputs via a pair of MC4 connectors (as used by the majority of Solar Panels), fed out the side of the lid so easily accessible.
(In the one above, I also fitted a couple of different battery monitors at each end to demonstrate. Just ignore those ;) )

Is it as smart as one of the "Battery Generators" or "Solar Generators"? Absolutely not, but I think this approach provides something just as capable but for a significant saving in cost :)
Is it worth doing this over just having a loose battery and a pair of jump leads? Absolutely yes, as you have a setup that is instantly usable in lots of different ways, with secure connections that won't drop off and no exposed terminal posts :)
Can you do this yourself? Again absolutely yes and with minimal tools and at low cost :D
 
Boat chanders sell the boxes,easy just to add a second battery or use a jump start box which has a cigy socket,some have usb to plus volt meter.
Starting from £40 up to around £70 trade prices are lower,mine cost £17

jump a.pngjump b.pngjump c.pngjump d.pngjump e.pngjump f.pngjump g.pngjump h.pngjump f.pngjump g.pngjump h.png
 
There is a discussion on Jagmanxs thread about extra power options that touched on "battery in a box" type setups.

I thought I would post some comments and pictures of what I think is a good low-cost way to use a old spare battery (or a new one bought for the purpose for that matter) in an easy, reliable and, most importantly, safe way.

#1 - Get a Battery Box.
Different sizes are available to suit whatever battery you have or are looking to get. The boxes tend to be similar in height and depth and only really vary in length.

#2 - Fit External Sockets and Connectors.
The things I fit are as follows:
Voltmeter - to keep an eye on the Battery State
USB Sockets - Charging phones, etc. A handy space-saver can be to use a Combo Voltmeter + USB Socket
12V Socket - usual accessories and a way for lower (<10A typically) charging or supply
Anderson Plug - connection for higher current charging or supply - upto 50A

I fit these to the lid of the battery box - Anderson Plug one side and the others on the other. I also fit a Switch so I can turn off the Voltmeter and USB sockets to save power when not in use.

View attachment 52607
12V, USB, Voltmeter and Switch (covers taped up for photo)

View attachment 52608
Anderson Plug

#3 - Internal Cabling
Next Step is to wire up the Battery to the connectors

On the lid run Ground and +12V wires of suitable gauge.
View attachment 52609
The +12V wires will go to fuse holders and the Ground will go to the battery

And on the box side, fuse Holders and the other side of the +12V cables, plus battery post terminals as appropriate
View attachment 52610
For the High Current Anderson Plugs, I use a midi-fuse Fuse Holder with mini-ANL fuse, and for the other circuits (USB, Volt and 12V Socket) I use a standard Spade Fuse holder.

This setup will give you a portable battery that can be used without having to mess around with croc clips and the like every time as it is all cabled up securely internally, no exposed terminals and the same connections as your regular ones fitted in the motorhome/campervan.

#4 - Charging
The 12V Socket and Anderson Plugs are by nature bi-directional so can be used for both Supply AND Charging.
The cables that can be used include the following:

12V - 12V Lead
View attachment 52620
One end goes in the 12V socket in the Battery Box; the other to a 12V socket in the van. If the Leisure Battery voltage is higher than the Portable Battery (if say the Split Charge is active), then the Portable Battery will get charged. If the Portable Battery voltage is higher than the Leisure Battery then power will transfer from the Portable Battery to the Leisure Battery and help supplement that supply via the 12V-12V cable.

12V Socket - Croc Clips
View attachment 52621
Another handy lead is the 12V Socket to Croc Clips. This can be used with the 12V-12V lead to connect direct to the battery and could be used for example to put some charge back into a low Starter Battery (not suitable for jump starting though!)

Anderson - 12V Plug
View attachment 52622
This is a handy lead as it allows the Portable Battery to be connected to the van for charging or to provide a boost, whilst keeping the 12V socket in the Battery Box free for use.

Having an Anderson Plug connection gives a lot of flexibility. You could have an Inverter with the DC inputs fitted with an Anderson Plug and connect to the battery. Or like in the example below, a Battery Charger with an Anderson Plug on the DC outputs to charge up the battery (maybe when left in the garage between trips?)
View attachment 52623

#5 - Example Setup
This is a photo of the Battery Box I use myself in a Gazebo at shows.
View attachment 52625

Same setup as the bigger box in the first photos, but fitted with a 75Ah battery that will fit in a medium-size box
View attachment 52624
I also fitted a Solar Controller (in this case a spare 20A PWM unit I had), wired permanently to the battery and with the inputs via a pair of MC4 connectors (as used by the majority of Solar Panels), fed out the side of the lid so easily accessible.
(In the one above, I also fitted a couple of different battery monitors at each end to demonstrate. Just ignore those ;) )

Is it as smart as one of the "Battery Generators" or "Solar Generators"? Absolutely not, but I think this approach provides something just as capable but for a significant saving in cost :)
Is it worth doing this over just having a loose battery and a pair of jump leads? Absolutely yes, as you have a setup that is instantly usable in lots of different ways, with secure connections that won't drop off and no exposed terminal posts :)
Can you do this yourself? Again absolutely yes and with minimal tools and at low cost :D
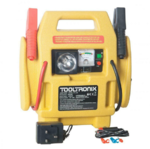
 
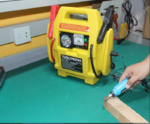
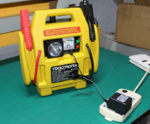
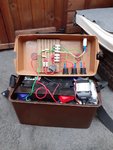
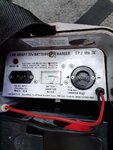
I have something very similar.
I have an old tp2 which I have modified a little.
It has a built in battery charger which works on 240v and 12v...
 
If one wished to purchase something along these lines, do you happen to know of a supplier who could provide a kit, or even a pre-assembled item to drop my own battery in to? ;)
There was a name on the tip of my tongue, give me a minute, I’m sure it’ll come to me.
Ahh! That’s it, Wildebus!
Of, Wildebus Enterprises International. Up North Somewhere*. Also online.

* Depending where you live. If in Scotland, down south.
 
There was a name on the tip of my tongue, give me a minute, I’m sure it’ll come to me.
Ahh! That’s it, Wildebus!
Of, Wildebus Enterprises International. Up North Somewhere*. Also online.

* Depending where you live. If in Scotland, down south.
10% commission Dave? Nah! Didn’t think so.
 
Nice. Is that a 3 or 5 stage smart battery charger? lol.

I didn't realise they even had batteries on the Arc. 🤣

Like me.. old but still does the job lol😊😂😂😂😂

Adding an integral battery charger can be a nice idea if you have one kicking around not doing anything. But personally I wouldn't do so as a decent (multi-stage) one is not cheap - plus they will add weight and heat into the battery box, which is a disadvantage on both fronts.
Same as having an integral Inverter, especially a decent one - cost, weight and heat
If you look at the old fashioned Lead Acid Jump-Start packs, the 'charger' they use is actually a basic plug-in AC-DC Transformer (which is why those Jump Packs don't tend to last for very long as the batteries in them don't get a great quality charge).

A Charger I DID add on my own Battery Box is a Solar Controller - and then only a pretty basic one which I already had and didn't really have any use for, and was small and light - so NO cost and very little weight and heat.
 
  • Like
Reactions: MJK
Interesting thread... I have a Clarke JS5in1 power pack like this
And it is only partially working and the battery no longer provides enough punch to start a 2.0 petrol engine ( neighbours) and never could start a 2.0 diesel. The compressor doesn't work but it has a torch, two USB points and an inverter along with two car aux sockets and a voltmeter. Mains charger long since died.
I have an old but good Numax 75 Ahr battery in the shed.
So, could I strip out the working component parts from the power pack and refit to a battery box using the Numax battery instead of the original Clarke (?) battery.
Anybody done this?
Advice appreciated
K ;)
If it fits, almost certainly, but I think it would be a squeeze :)

I've just realised I misread the question!
I thought you meant taking the power pack battery out and putting the Numax battery in the box (in which case, see above :) )
removing the various gubbins and moving to a new battery box .... again probably work fine but in that case not a space problem :D
 
Last edited:

Users who viewed this discussion (Total:0)

Back
Top