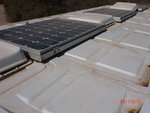
Replacing rooflight vent sealant

OK, just seen this post. I had the same problem in July this year on our 2010 Adria Twin (manufactured 2009).
As you say, there is a piece of plastic which turns the corrugated roof into a flat roof for the heki.
This plastic piece is glued to the roof with a strong adhesive and you will not remove it without totally destroying it. First, identify where the leak is.
Dave - thanks for this. It looks like ours is slightly different as there is sealant between the roof and adaptor and also sealant between the adaptor and the heki - see the photo, unless the adaptor is glued to the roof and the joint is covered with sealant, which would be overkill. As it is fitted is original as we bought the van when it was 5 months old.

I am not even sure there is a leak as it is difficult to tell what is a bit of condensation between the metal roof and ceiling boarding, it's not very well insulated - as seen when taking one of the roof lights out. What was your leak like?

I need to find time to investigate further.
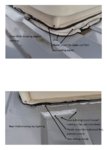
Hi David
Yours is the same as ours as can be seen from the photo I will attach. Ours is also original as we bought the van new. Like us, you must love the van, keeping it so long.
The construction is as you describe and isn't overkill. The problem for Adria was getting the roof flat so that the Heki can be sealed, as it will only seal to a flat roof. If you do the job, please don't go along the lines of trying to fill the gap purely with sealent as the gap is too large. If you want a lasting seal you must use something to first flatten the roof. I've looked in my shed and I still have the left-over plastic I made the inserts from which flatten the roof, which you are welcome to. There should be just enough for one Heki. You need plastic which is exactly 7mm thick to fill the corrugation. I rooted around our local "Plastic Man" and found skirting board which was 7mm thick.
Our symptoms were water leaking in when the van was parked with the front down. The water was running along one of the corrugations and seeping through a gap between the roof and the plastic fill. Park nose up and the water ran away from the fail off the back of the van. I found the reason, twofold, there are wooden battons running around the gap between the inside of the roof and the ceiling, as you will have seen when you removed the inside cover of the Heki. In one corner, there was a gap of about 2mm running for about 150mm. (I filled this gap stopping any roof flex) This has allowed the roof to flex at this point causing the glue holding down the plastic fill, to fail at this point. This showed up the second failing; the plastic fill is not solid. It is a moulded sheet. Adria has used glue to fill the gap between the plastic fill and the roof. This is why I am saying don't use filler/glue to level the roof. Over time it fails.
The job was not difficult but was time-consuming. Shaping the (I think it was) 15 fillets took hours. Removing the Heki was quick but removing the plastic insert and cleaning the roof took a couple of hours. Gluing down the inserts was quick but took 24 hours for the glue to cure. (Your roof is open at this point) Cleaning off the old non-setting sealant from the Heki took some time and was messy. Setting the Heki down with the new non-setting sealant was quick. I did all this on my own but a second person would have made the job easier (handling the Heki).
Hope this helps, Dave.Heki roof.jpg
 
  • Like
Reactions: UFO
The tape is what I always use, it's about 1/8'' thick 1'' wide, creamy colour, sticky as hell, and sort of banana skin softness :):) it does squeeze out a bit, don;t skimp on cost, get it from a caravan shop not Ebay then you can see it, I have some in my garage I'll see if there is a makers name on it, got mine from Kenmores in Morley, £19 a box I think.

Just remembered they sell on Ebay, this is the exact stuff I have.

https://www.ebay.co.uk/itm/19m-leng...-sealer-TS5-/173475282490?hash=item2863eebe3a

They do a shorter roll, but I bought mine 5 years ago and jsut used some to seal another, so as long as it's kept in the box it has a good life, better price per meter too.
Just getting around to fixing my roof vent. Yes, I know it has been a year. Odd thing is we have been out in torrential rain with no leaks. Only twice in the last year has the water come. Anyway I will be adopting the method used by 'davecumbria' but with the mastic tape sealant strip, as above. A question for those of you who have used the tape. How do you do the corners where one piece of tape meets another at 90 degrees? Cut the tape so that there is a butt joint or overalp the tape?
 
trouble with sikaflex and stixall is that they're adhesives, not sealants . trying to remove a vent that leaks or is damaged can mean destroying the vent, so i now use butyl rubber mastic or tape ,or a combination of both
 
trouble with sikaflex and stixall is that they're adhesives, not sealants . trying to remove a vent that leaks or is damaged can mean destroying the vent, so i now use butyl rubber mastic or tape ,or a combination of both

Sikaflex produce many sealants, and adhesive sealants, the one that remains the consistency
of tough plasticine over it's effective life, is their 710 Butyl Sealant, very good for sealing roof vents
can be very messy! But at least you can remove the vent after 10 years and scrape the
remaining sealant off fairly easily.
 
MY Adria Win is older - 2004. I noticed water coming in through the roof on the left one day in bad rain. Then I found it must have been coming in on the right at some point as the trim was wet. Wasn't happening all the time but took it to my trusty local campervan chappies who had a look and decided the mastic had deteriorated so they took both rooflights off and re-sealed them for me.

Fingers crossed it has done the trick.
 
I am not planning to use adhesive, Sikaflex or any other, between the rooflight and the van roof. I intend to use mastic tape sealant. My question is how to do the corners where two pieces of tape meet. Any helpful advice on this would be appreciated.
 
I am not planning to use adhesive, Sikaflex or any other, between the rooflight and the van roof. I intend to use mastic tape sealant. My question is how to do the corners where two pieces of tape meet. Any helpful advice on this would be appreciated.

Mitre the tape corners accurately with a sharp knife, as you screw down the edges will
amalgamate and seal. If you just overlap it might take greater fixing down pressure
to squeeze any tiny gaps out.
To make the mitre just overlap the tape cut through the 2 thicknesses then carefully peel back
and remove the 2 waste bits, perfect every time!
 
  • Like
Reactions: UFO
These Fiamma vents are sealed with Sikaflex 710 Butyl Sealant cartridge applied
about 8 years ago. The thing to watch out for is the slump value of the sealant
if it has a high slump (runnier) it won't fill deep corrugations without possibly
pulling away over time from the top surface and leaving a potential leak point.
I found that about 10mm was probably the max. as on my pic., any more and I
would probably build up with Butyl Tape and then use Butyl Cartridge application over.
The butyl is white but the exposed surface gets grey/black mould colour thin
skin eventually. The brown stuff on roof is Moroccan sand!
Never had a hint of a vent leak in the 8 years.CIMG0176.JPG
 

Users who viewed this discussion (Total:0)

Back
Top