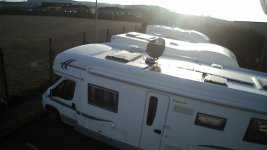
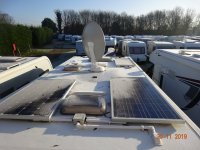
Solar panel installation.

sydnsue

Full Member

Messages
260
I am picking up a 2021 Elddis in June and I need solar fitted. Most of the suppliers reckon 4 to 5 hours for installation and accordingly they are charging more than the cost of the hardware. I am therefore considering fitting it myself but I cannot see how it takes that long or am I missing something?
Glue the panel to the roof.
Drill hole for cable and fit cable cowl to roof.
Position controller inside.
Connect solar cable to controller.
Connect controller to battery.

Does this really take 4 to 5 hours?

While on the subject, I was thinking of buying from Sunstore the 120W kit which includes EP Solar MPPT Dual Battery Solar Charge Controller 10A . Any comments on that? Seems reasonable at around £300.

I've never fitted one before so all comments and advice welcome.
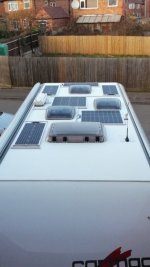
Most competent DIYers should be able to do it themselves. Best thing to do is search around YouTube and see how others have done it before jumping in the deep end. Should give a good idea of what is needed and how long. I would say if it is your first go it will probably take twice as long as you think 🧐
 
The job itself is very straightforward if you follow the correct procedure & in order, I've fitted all but this last one due to lack of fitness I've never glued a panel though, I prefer rigid on brackets but the rest is the same, but if you are fitting to someone's pride and joy you have to be very careful not to do any damage, and it has to be done properly it may involve removing trim and hiding cables etc, it needs to be done in a tidy manor, fitting your own can be as easy or complicated as you choose.

I think 4-5 hours is about right, taking into account wages, rent tools etc as David mentioned on another thread.

The components can be as less than £200 depending on type, size and quality.
 
Fit controller to battery first then connect panels.

IMG_20230213_162135.jpg

It's easy enough to do yourself. Ask the Dealer to fit the roof gland or drill your own. The panels on mine are semi flexible mounted on 15mm anodised square tube which was stuck in place using Sikaflex. Panels were then pop rivited down the outer edge and the inner ones glued. 3 strips of 15mm square for the smaller panels 5 strips for the larger panels. I then used plastic trunking for the cables.
 
Thanks everyone. I know the hiding of cables inside is always the tricky job. Maybe it will take me 4 hours but there again I'm not doing this every day like a fitter will be. I shall certainly go for it though.
On my last van, I changed the controller to a dual battery type. I can't for the life of me remember where I connected the vehicle battery cable.
 
200w of panels will cost arount £200 and a good votronic mppt regulator about £115 or so, use a boat deck cland for cables, hide this under the panels, these screww down and are a good job, remember glueing panels to a roof is only as good as the thin layer of paint, i would not do so, others may so ok, not for me.
You will have no bother doing it yourself and take time to do it correct and tidy, good luck.deck g a.png
 
200w of panels will cost arount £200 and a good votronic mppt regulator about £115 or so, use a boat deck cland for cables, hide this under the panels, these screww down and are a good job, remember glueing panels to a roof is only as good as the thin layer of paint, i would not do so, others may so ok, not for me.
You will have no bother doing it yourself and take time to do it correct and tidy, good luck.View attachment 67634
I know cleaning the surface is all important but I take your point about the thin layer of paint. I had a pro fit one last time and they used screws as well as adhesive but that was so I didn't have to wait in the workshop overnight. Not sure about the boat deck gland though. That's another 4 holes in the roof.
 
I know cleaning the surface is all important but I take your point about the thin layer of paint. I had a pro fit one last time and they used screws as well as adhesive but that was so I didn't have to wait in the workshop overnight. Not sure about the boat deck gland though. That's another 4 holes in the roof.
Its a better job than what most folk use, its sealed with rubber washer and has stainles screws, if its good for a boat then no prob on and under the panels. (y)
 
On my last van, I changed the controller to a dual battery type. I can't for the life of me remember where I connected the vehicle battery cable.
Only two places I can think of, the batteries and the controller, but I've just got up so maybe not firing on all cylinders yet.
 
To be honest, I wouldn't rely on the panels just being stuck down. When mine were installed the guy screwed them to the roof, with lots of sikaflex to seal. He said he's seen far too many rooves being damaged by panels being lifted by the wind - damage that's not always visible until the leaks start.
 
Is there any real advantage of the stick down ones? I've always gone for the rigid ones on end or corner mounts, just stuck down not screwed and never lost one.
 
hi sydnsue. i never use screws in my roof except the sat dish as i can replace the base & leave it on the old m/h .my 2 panels at the back came off my old m/h for 10 years & are on our new m/h for 4 years & still pumping out good amps . when i installed the panels i left a gap between the L brackets & roof with spacers in case i wanted to take them off which i did & it was a piece of cake taking them off for the new m/h ( AS DEALER WAS GIVING ME NOTHING FOR £2000 OF EXTRES ) swift m/h's don't screw them down just make sure you have rubbed the surface to form a good bond . i use one of these for taking things off using the fine blade . cheyenne

PICT0004.jpgInkedDSC00742 solar panels_LI.jpg
 
I'm not sure where I read it, maybe on a tube of Sika stuff, never use it though, and prefer Stixall, same outfit, but it said to use a 10mm bead but only squash it down to leave it 1mm thick so I have some 1mm diameter wire and use a couple of short bits and bury it in the sealant.
 
I'm not sure where I read it, maybe on a tube of Sika stuff, never use it though, and prefer Stixall, same outfit, but it said to use a 10mm bead but only squash it down to leave it 1mm thick so I have some 1mm diameter wire and use a couple of short bits and bury it in the sealant.
Good tip.
 
Plenty of tutorials available inc this

I plan to do my own when the new m/h arrives.I'll avoid drilling multiple holes for each corner bracket so will use aluminium strips to give a greater surface area and drill holes for the Sikaflex to squeeze through and form a mushroom head.
 
Last edited:
I recently had two additional panels fitted by Sunstore. They do lots of installations. When I enquired if they would be drilling holes, a very firm no was the answer. I waited overnight for the stuff to set. They may have removed paint, I don't know.
 
Plenty of tutorials available inc this

I plan to do my own when the new m/h arrives.I'll avoid drilling multiple holes for each corner bracket so will use aluminium strips to give a greater surface area and drill holes for the Sikaflex to squeeze through and form a mushroom head.
Not sure what you mean there, no need to drill at all if you prep the area well first, I've never used it but Sika do a primer as well as adhesive.
 
The people who love using Sikaflex to glue down panels will never accept the panel will come off and no point in persuding them otherwise.
The people who have seen stuck down panels come off with the slightest persuasion will never accept that using adhesive alone is safe.
and never the twain will meet :)

For myself, having removed dealer fitted adhesively fixed solar mounts in a few seconds by pulling them up with my little finger (and I mean that quite literally - went on the roof armed with sharp blades, chisel and claw hammer but used my pinky!), you can guess what camp I am in ;)
All we can do is pass on knowledge we've gained. I don't really care what others do with it ... as long as their panels don't come off on the road and hit me.
 
Not sure what you mean there, no need to drill at all if you prep the area well first, I've never used it but Sika do a primer as well as adhesive.
Should have said aluminium angle not strip but as a DIY install and with vehicle under warranty I want to avoid drilling all but the single entry hole and will film the whole thing including creating a strong key by removing the paint.As Wildebus has highlighted, I'm comfortable I can do a more robust job than a dealer
 

Users who viewed this discussion (Total:0)

Back
Top