Pudsey Bear
Full Member
- Messages
- 16,156
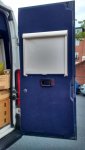
092 59a outside of cassette access with painted ply infill panels, I filled the door in with a 20mm thick
polystyrene to stop the cassette contents freezing 2013-05-31 11.54.33

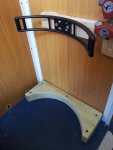
093 59b modified rubbing strip, used old plastic internal panel linings to make a new reshaped top,
not got new clips yet hence foot holding it up for the picture

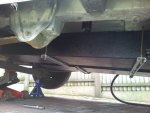
094 60 a shower plumbing under floor B&Qs finest 32mm domestic 2013-05-31 11.04.34

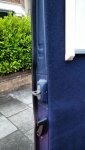
095, 61a have to do this before fridge housing can be fitted, it's the off side rear corner carpet and wrapped
corner panels, this is where the sofa/bed is going 2013-06-10 15.04.47

096 61b window surround etc all carpeted 2013-06-10 15.04.46

097 63a wrapping the back panel which goes behind the seat cushions 2013-06-16 11.02.16

098 63b wrapping back panel 2 Spray adhesive came from Megavanmats, good stuff sticks like you know what,
only 5 mins drive from me

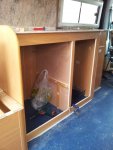
100 64 a first part of fridge plinth, all pinned and glued, this was so the bottom fridge vent could clear the rubbing strip 2013-07-06 11.31.55

101 64b service holes done and 32mm waste for a gas tube so gas is isolated from any possible shorting to electricals, slots in holes are for the gas drop out vents to be efficient should there ever be a leak as this was going to be sealed to the vinyl floor covering (harrisons Cleckheaton) 2013-07-06 15.24.43

102 64c other side 2013-07-06 15.25.00

103 64d 2 large tube for blown air, the other for water pipes and cables, 2013-07-06 15.34.13

104 64e showing cutouts to allow any leaks to pass, it will of course be the other way up 2013-07-06 15.34.29

105 67b plinth for fridge, drop outs done and meshed, Flex is for the 240v fridge socket. Not sealed to floor yet 2013-07-10 16.00.53

polystyrene to stop the cassette contents freezing 2013-05-31 11.54.33
093 59b modified rubbing strip, used old plastic internal panel linings to make a new reshaped top,
not got new clips yet hence foot holding it up for the picture
094 60 a shower plumbing under floor B&Qs finest 32mm domestic 2013-05-31 11.04.34
095, 61a have to do this before fridge housing can be fitted, it's the off side rear corner carpet and wrapped
corner panels, this is where the sofa/bed is going 2013-06-10 15.04.47
096 61b window surround etc all carpeted 2013-06-10 15.04.46
097 63a wrapping the back panel which goes behind the seat cushions 2013-06-16 11.02.16
098 63b wrapping back panel 2 Spray adhesive came from Megavanmats, good stuff sticks like you know what,
only 5 mins drive from me
100 64 a first part of fridge plinth, all pinned and glued, this was so the bottom fridge vent could clear the rubbing strip 2013-07-06 11.31.55
101 64b service holes done and 32mm waste for a gas tube so gas is isolated from any possible shorting to electricals, slots in holes are for the gas drop out vents to be efficient should there ever be a leak as this was going to be sealed to the vinyl floor covering (harrisons Cleckheaton) 2013-07-06 15.24.43
102 64c other side 2013-07-06 15.25.00
103 64d 2 large tube for blown air, the other for water pipes and cables, 2013-07-06 15.34.13
104 64e showing cutouts to allow any leaks to pass, it will of course be the other way up 2013-07-06 15.34.29
105 67b plinth for fridge, drop outs done and meshed, Flex is for the 240v fridge socket. Not sealed to floor yet 2013-07-10 16.00.53


 2 the one behind 2013-08-08 ...jpg")


 ...jpg")