You are using an out of date browser. It may not display this or other websites correctly.
You should upgrade or use an alternative browser.
You should upgrade or use an alternative browser.
What did you do to your van today?
- Thread starter Vanterrier
- Start date
Scotia
Full Member
- Messages
- 1,338
I heard it cost you a few drinks !You realise Wully will be after a set now, obviously in some royal tartan.
after i poured a pot of chilli over them at new year christine will need a new set luckily it was before i’d had a drink lol
Molly 3
Full Member
- Messages
- 1,782
Sorted new thermostat , just for your info I read thermostat can be affected by dust and may need cleaning ??? As we say in Sheffield bang a nuen on ,How is your heating working barry
Winks
Full Member
- Messages
- 1,056
Got to agree. After all the buggering about that I had,I wish I’d known about that particular wrinkle beforehand.Sorted new thermostat , just for your info I read thermostat can be affected by dust and may need cleaning ??? As we say in Sheffield bang a nuen on ,
Cheers
H
marchie
Full Member
- Messages
- 4,806
Took Brunhilde for a 28 mile drive to get the engine thoroughly warm and to get some worthwhile topping up of the Vehicle Battery[ 'VB]. Yuasa say that the VB won't charge at a high enough voltage just from solar/trickle charge et al, and that the Battery will degrade quicker if it's not recharged to about 14v regularly. So, that's my duty done, and my parking space was still free when I got back!
Steve
Steve
Scotia
Full Member
- Messages
- 1,338
3 to 4 hours they said.....aye right!
Both weld nuts broke loose trying to remove the bump stops. Managed to slide a wedge inside the tunnel to hold the nut whilst undoing the cup for the bumpstop. Next task was to fit the bellows so wedged the centre nut on the bellow whilst holding the nut within the tunnel over the hole with my finger, presenting the bolt through the hole balancing the bellow on one hand and then trying to spin the nut with my finger in a blind hole. Was determined to get both done tonight so now a well deserved pint.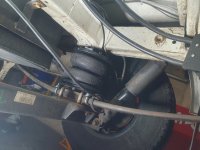
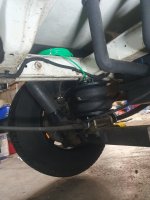
Both weld nuts broke loose trying to remove the bump stops. Managed to slide a wedge inside the tunnel to hold the nut whilst undoing the cup for the bumpstop. Next task was to fit the bellows so wedged the centre nut on the bellow whilst holding the nut within the tunnel over the hole with my finger, presenting the bolt through the hole balancing the bellow on one hand and then trying to spin the nut with my finger in a blind hole. Was determined to get both done tonight so now a well deserved pint.


Wully
Full Member
- Messages
- 2,989
Sam did you check and read the instructions properly because I think you have got them the wrong way round there’s a tiny L for the left and a R for the right on the bottom that you won’t see now that you fitted them I’d take them back off and check if I were you.
Scotia
Full Member
- Messages
- 1,338
Up yer erse sun!Sam did you check and read the instructions properly because I think you have got them the wrong way round there’s a tiny L for the left and a R for the right on the bottom that you won’t see now that you fitted them I’d take them back off and check if I were you.
rugbyken
Full Member
- Messages
- 1,655
when i had the bellows fitted on mine there was a steel anchor plate for the seat belt that fouled the bellows when squashed it was that close i had to take it of secured by 12 long bolts through floor, bolt heads under boiler took them off cut away some clearance of the plate & refitted about 2 days graft
Scotia
Full Member
- Messages
- 1,338
The only thing I have had to cut was the excess threaded area on the link arm this was in the instruction book to remove, it also shows position to move the hand brake cable but there is no way there is enough excess to move and attach to the bracket supplied, I shall check again when I have the wheels on the ground.when i had the bellows fitted on mine there was a steel anchor plate for the seat belt that fouled the bellows when squashed it was that close i had to take it of secured by 12 long bolts through floor, bolt heads under boiler took them off cut away some clearance of the plate & refitted about 2 days graft
Scotia
Full Member
- Messages
- 1,338
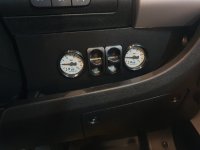
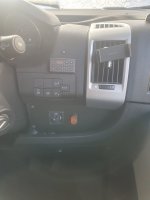
Spent most of my time this afternoon deciding where switches and compressor will go, thought it best to site them first before running the air lines. Suggestion in the book along with brackets to locate the compressor under the drivers seat but a no go as that's where the leisure battery is. Finally decided the foot well is the best place as there is no door that side. Then thought i could put the switches and guages into a cover I was going to make up for the footwell instead of removing the switches for the mirrors as there were a lot of wires, must be getting old as finding it difficult to make snap decisions nowadays.  Revrted back to the original idea mounting the guages on the dash.
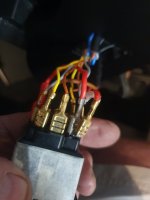
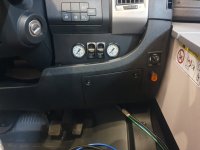


Last edited:
Scotia
Full Member
- Messages
- 1,338
Na beer was calling loudly. I still have routes to tidy up and mount the compressor. I'll run the air hose along the hand brake cable from where it mounts solid to the chassis that will keep them out of harms way and then take into the cabin through the grommet where the hand brake cable enters, the compressor is just below the handbrake. I have the wire harness connected up ready to go.
Exwindsurfer
Full Member
- Messages
- 4,451
Had to put battery on charge as it wouldn't start
marchie
Full Member
- Messages
- 4,806
Get yourself an AMT12-2, Jeff, and have all that spare solar keep the Engine Battery topped up! You have the knowledge and skills to fit it yourself, unlike me, whose knowledge stops with the opening of the wallet ...Had to put battery on charge as it wouldn't start
Steve
Pudsey Bear
Full Member
- Messages
- 15,999
I moved ours in preparation for filling it with our crap and water, I brought the hose into the conservatory to thaw out, t'were a bugger to coil up, ends together of course.
I hope the weather is kind to us, I don't do cold but for a base model Swifty it seems t be fairly easy to warm up.
I hope the weather is kind to us, I don't do cold but for a base model Swifty it seems t be fairly easy to warm up.
Trotter
Full Member
- Messages
- 4,019
Be careful when replacing it, if you have too. My back still gives me little reminders.Had to put battery on charge as it wouldn't start
Don't forget Alpha Batteries do a great deal
Users who viewed this discussion (Total:30)
Landyseverywhere,
saxonborg,
Exwindsurfer,
2cv,
GeoffL,
AllanD,
TeamRienza,
marchie,
HurricaneSmith,
Obanboy666,
John and Enid,
rugbyken,
Donny Mac,
Lee,
runnach,
Owen1953,
Geek,
oppy,
wildebus,
Bertietoo,
byron,
exmusso,
Ted,
Rogerdodger,
Rec,
The laird,
Stonedaddy,
Phantom,
Livotlout,
Boots,

