What did you do to your van today?

Won't have much fun without greasy nipples :(

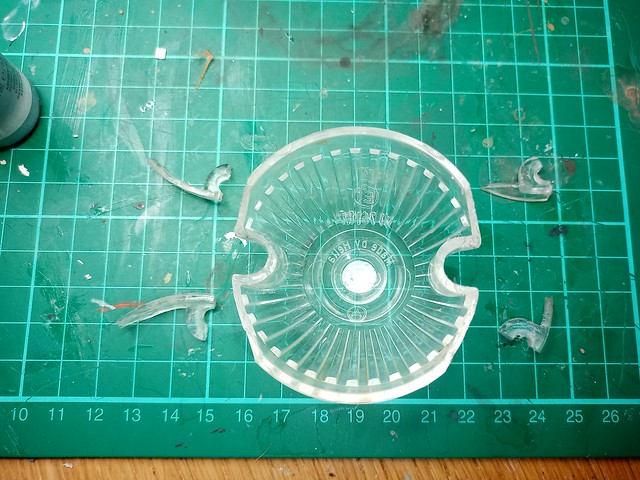
I remembered a couple of years ago I had some corrosion in the top marker lights due to a cracked lens. So decided to remove the lens to check size for replacements.
Looks like none available of the right size, which is a shame as this is what the lens looks like ....

Marker Lamp by David, on Flickr

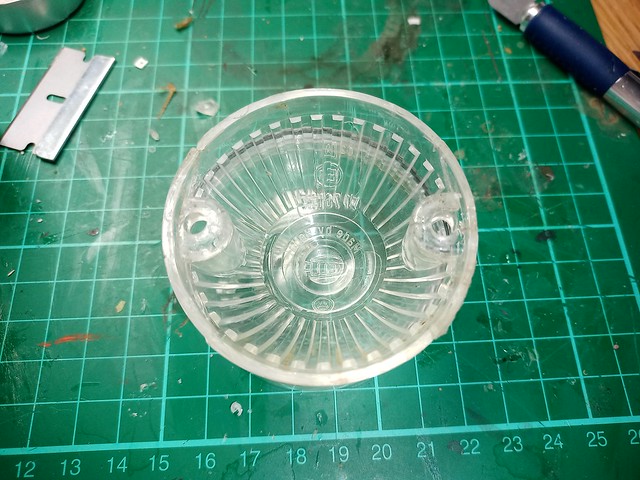
Gave it a clean. Removed glue from a previous repair (before my time) and attempted a repair using Poly Cement (the stuff you use when making Airfix models).
Actually seems pretty reasonable.

Marker Lamp by David, on Flickr
Refitted and carefully screwed in bolts enough to secure but not enough to break it again :D
Elaine's got the same make of self-healing cutting mat for her sewing [minus the glue and other stains!], David. Olfa, IIRC. If I were to 'borrow' the mat for M/Home repairs, it would be the last thing I ever did; and Elaine's next project would be a custom made shroud for me ... :D

But nice repair job!

Steve
 
Don't no if I've done correctly jacked up
And pumped till felt resistant On each nip
Total 3 tubes of grease..on 4 axles nips
 
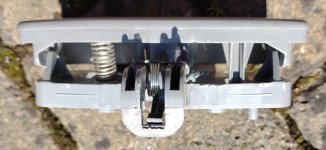
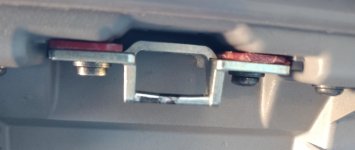
On our 2009 Adria Twin Fiat Ducato PVC the centre glovebox has not stayed closed for a while. Looking on the Fiat forums the catch is a weak point, often failing. Having worked out how it works and that the spindle is too short so the catch does not stay straight I improvised a fix. It now stays closed when it should. Result!
 
On our 2009 Adria Twin Fiat Ducato PVC the centre glovebox has not stayed closed for a while. Looking on the Fiat forums the catch is a weak point, often failing. Having worked out how it works and that the spindle is too short so the catch does not stay straight I improvised a fix. It now stays closed when it should. Result!
Any photos, please?

Steve
 
Any photos, please?

Steve
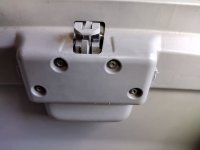
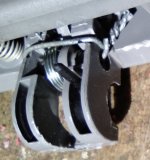
This one shows the out of line catch. I drilled through the spindle, using a pin vice, put a piece of wire through the hole and twisted the ends together to pull the supports that the spindle goes through together. I did not take a photo - will do so tomorrow. The bar that the catch latches onto also needed adjusting and probably could do with a bit of fine tunning.

IMG_20230403_130332339.jpg
 
Some photos showing detail of my 'twisted wire' solution and where it is on the catch. I also put a spacer under the bar where the catch latches onto as it was not aligned meaning that the glovebox needed a shove to get it closed. It now works as good as new. Been like it for a long time and getting worse so nice to have it done.

IMG_20230404_112942656.jpgIMG_20230404_113938422.jpgIMG_20230404_115142090.jpg
 
Won't have much fun without greasy nipples :(

I remembered a couple of years ago I had some corrosion in the top marker lights due to a cracked lens. So decided to remove the lens to check size for replacements.
Looks like none available of the right size, which is a shame as this is what the lens looks like ....

Marker Lamp by David, on Flickr

Gave it a clean. Removed glue from a previous repair (before my time) and attempted a repair using Poly Cement (the stuff you use when making Airfix models).
Actually seems pretty reasonable.

Marker Lamp by David, on Flickr
Refitted and carefully screwed in bolts enough to secure but not enough to break it again :D
As it's a Hella lamp you should be able to replace it, just done all my rear lamps on a 15 year old van, found a dealer who wasn't frightened of looking things up and if no luck speaking to Hella direct.


May fit?

 
Last edited:
As it's a Hella lamp you should be able to replace it, just done all my rear lamps on a 15 year old van, found a dealer who wasn't frightened of looking things up and if no luck speaking to Hella direct.


May fit?

I searched ebay .... none the right size. (Need 50mm between holes and 63mm wide base)
I can get replacement rear marker lamps oddly enough but not front. I was going to try Magnums and O'Leary but the repair seems to have worked better than I expected so may just leave as is :)
 
Important to have tools and kit to deal with stuff whilst away from home in the Motorhome, but don't want it cluttering up the place. So spent some time doing some sorting out and rationalisation (now I don't do anyone elses vans, I just need to carry stuff I might need on my own).
Bottom of the box is the 'big tools' - selection of spanners, pliers, crimpers, cutters, etc, plus a Clamp DigitalMultiMeter.

Tools by David, on Flickr

In another box is electrical and fittings type of stuff - fuses, connectors, screwdrivers, screws, wire, tape, etc.

Tools by David, on Flickr

All go nicely into a Makita Toolbox

Tools by David, on Flickr

Which fits neatly into the lower (ex-battery) locker of the Motorhome, totally out of the way of the day-to-day living :)

Tools by David, on Flickr
(the blue box on the right hand side is all the straps, pegs and heavy-duty Fiamma kit to help secure the awning if it is a little blowy, so that is nicely out the way as well (y) )
 
Little job been wanting to do for years ... try to have the Remis blinds close without having to remove the Sat Nav off the screen :(
Not a lot of good :(

Sat Nav
by David, on Flickr
The Garmin holder is just too fat to work, and with the standard Rear View Mirror mount being attached to the screen, the only place the Garmin Mount would stand a chance of working was impossible to use.

Sat Nav
by David, on Flickr

So invested a silly amount of money (£27!) in a Ducato Rear View Mirror kit, immediately removed the Mirror from the holder and threw it in the bin (not really ;) anyone need a new mirror? going cheap :) ) and modified the Support to take the part of the Garmin Holder that clips to the Sat Nav unit itself

Sat Nav
by David, on Flickr

Now got the Sat Nav where I need it, not obstructing the Remis blinds and also not occasionally falling off the screen when the Sucker unsucks

Sat Nav
by David, on Flickr
(shame about the lead but can't have everything :) )
 
not today but a few week ago I have upgraded my lithium battery's 3X 100ah lithium's to one big 360ah to make more room for storage, If any one's interested in buying lithium battery's I have advertised in the for sale section on here
 
Little job been wanting to do for years ... try to have the Remis blinds close without having to remove the Sat Nav off the screen :(
Not a lot of good :(

Sat Nav by David, on Flickr
The Garmin holder is just too fat to work, and with the standard Rear View Mirror mount being attached to the screen, the only place the Garmin Mount would stand a chance of working was impossible to use.

Sat Nav by David, on Flickr

So invested a silly amount of money (£27!) in a Ducato Rear View Mirror kit, immediately removed the Mirror from the holder and threw it in the bin (not really ;) anyone need a new mirror? going cheap :) ) and modified the Support to take the part of the Garmin Holder that clips to the Sat Nav unit itself

Sat Nav by David, on Flickr

Now got the Sat Nav where I need it, not obstructing the Remis blinds and also not occasionally falling off the screen when the Sucker unsucks

Sat Nav by David, on Flickr
(shame about the lead but can't have everything :) )
That looks really neat, but have you not now lost your rear view mirror?
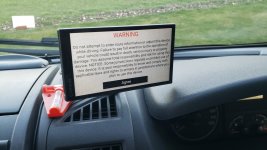
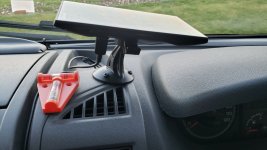
I dont like screwing stuff to dashboards or anywhere else I can avoid, but this is my solution to satnav and remis blinds...
20230404_191046.jpg20230404_191038.jpg
Satnav in perfect position (for me) and yes, I do have screwholes now in my dash (as the original 3M pad didn't hold) but you know - if you use it, You bruise it...
K ;)
 
That looks really neat, but have you not now lost your rear view mirror?
I dont like screwing stuff to dashboards or anywhere else I can avoid, but this is my solution to satnav and remis blinds...
View attachment 66642View attachment 66643
Satnav in perfect position (for me) and yes, I do have screwholes now in my dash (as the original 3M pad didn't hold) but you know - if you use it, You bruise it...
K ;)
I had the mount for the rear view mirror. But I didn't have a mirror (which I why I had to buy one :( ). If I DID have one, I would have seen this ....
Bid5GfVKjMWuBkPGyYLwEr6HH_lWL4n5QkejJSqbxfjKQzvekqmWq2IoJkRhv6-olc_aVh7Ulu1jt8xv6CBA_NlQqQFmSOFL3vPYFFik0vj4Qp83FXv06QpUsqgUaTxe2CETs2-6NCO5MCUl01DxFlJZG4X_e9NfhSZJ5oyDFOSDY-DVLJVCuN2RCvPNYTaZFR9Bxr9xLxQ91K6XtYeRFIxR8SRYMvkcb3L6kOh9ov2IVGFtsPjwI6q3ZuKAj2xB-UNh_Fi7ZcVC_v32LWY7MlL9IjXa3ZINi44ll3WX46q9JGHDIymXRy9RbUmmjPY_0M3_VRDgo08UiTbd0O3n2kk8pfG5WPbHuKsGYd6kkYlfifydQ0twpBhGs0ZsXs2fdQqg959-dlJxPCILE7jms4lJIglIiHqRxJyRYtl2VQq3ePDVpHMUd-TGBz6MbuJZeMpjX3-v88xWGXMXYrhVwA6oUob-DCuRg4E-m6og6Rgn5D3JuODh7tibxC8UlfbMDTkeaLCLOzS1C_dNzkg53O_mApnn3W5wSOe_ATmEz8704dG7HmDP-6-ogTWkpmTCT67X8SEg7vnVANtQDg31cduEUFQKDVXW_6oOHxga_V2P6MZncVlQFivq3zcmOLzxASZpuN7TX2W6h4M65kvH1EKTzVTOjx6-8tEtSjgBHlxkq9IkifetHqZGhfclIY-BHUsaLWzwhSnj3Eapxd7QXcqiv4YlT6bmnCFIOxkf1LOvvLQSfmQNZH8kVZu06Vomlhbm7yGOel0csNM4lfScDg2l7ZjyePO1D_kVcigsJYafwvoFIkNABhu-TCNaKPy9E-lzN3TDBz5h4krtNUSnHbrkq9Tn1ymtSvxbQJV22VfaL7JgcbFJ8CpGmYztBaZhkIDJ_DIIyEZvOQ0UCuyYs9kf3ck3cTP1lX3BvIPW8NADBDHLmY1hH4MGDD4PVuZqedoGFP9sQ2RWulqhdqyZseQ=w631-h405-s-no

Door to the rear bathroom :) I guess the windscreens for the vans have the mounts prefitted as standard?

But I do have a rear view in the traditional place now .... (Terrible photo mind!)

Rear View
by David, on Flickr
 
PS. I have this mount - https://amzn.to/3Gh3GZ6 (but currently unobtainable) - for my phone and I have this mounted on the dash section just by the drivers door. It has two very good features ....
1) It is totally solid. Although a suction mount it has not shifted a tiniest amount in 18 months.
2) It uses a ball-style swivel for the phone cradle bit and it is exactly the same ball size as the Garmin I have - and I think you have going by your photo.
So if you happen to be on the lookout for a screw-free mount, I would definately recommend this.
 
If I use my phone for sat nag, and I use the silicone type mat 6''x6'' piece in the bottom of the binnacle, it sits there quite well and never moves, If I use my 10'' tablet (rarely) I use the same mat on top of the binnacle, and the top of the tablet leans on the screen and also never moves and isn't in my line of sight.

It has Remis blinds too and a mirror, the mirror has one of those awful mirror mounted reversing cam screens, which is a pain when I want to close the blinds at night.

As for mounting stuff instead of using screws I use this 3M stuff it will handle a lot of weight, I had some on my Tom Tom and it never moved off the dash unless I wanted it to, sticks like Sh1t.


For quite a while (how unlike me :) ) been deciding which Dashcam to fit to the Motorhome.
Not a question of which one to buy, but a choice between the simple one I bought in 2015 and never got round to fitting to the car, or the dual camera one I bought in 2015 for my then-new Campervan build and took out when I sold it.

Decided on the simple one - an Elephas A118C (https://amzn.to/3zxedM2) fitted at the bottom of the screen to avoid it fouling with the Remis blind. The fancier one (a Koonlung K1S (review here ) I don't think would get the most out of as the wired rear camera would be very tricky to fit on a custom motorhome. I'll maybe fit the K1S to the car, or sell it on (it is a high spec system even now) and get a basic one for the car.
 
Back
Top